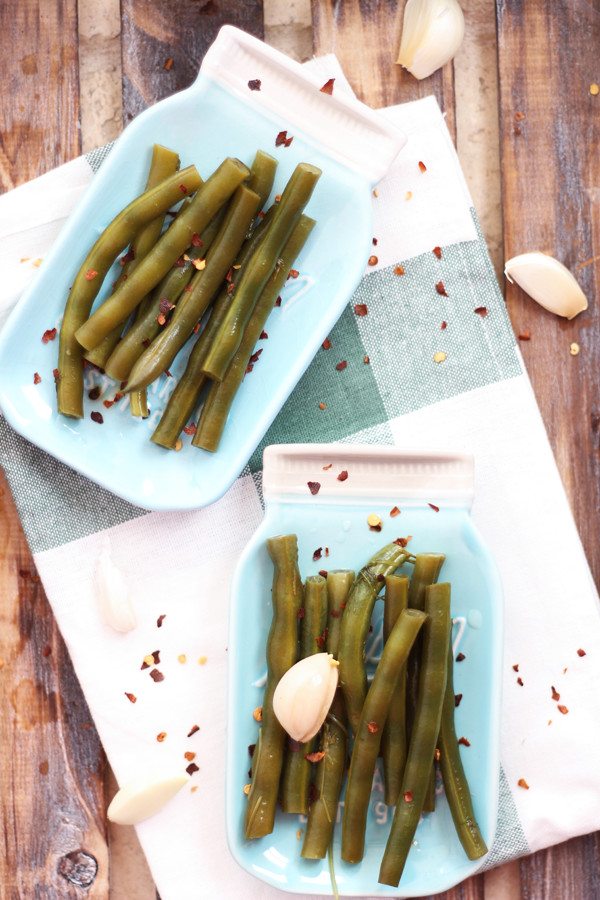
My Spicy Garlic & Dill Pickled Green Beans are absolutely delicious! Sour, garlicky, a little spicy and crunchy. These would look great on a charcuterie plate with an assortment of cheeses, meats and olives. Would be amazing in a Bloody Mary or as a quick probiotic snack.
Green beans are an easy vegetable to ferment, because they stay crunchy, take little preparation and they adopt the spices and herb flavors in the brine well.
The method
This method of pickling is called Brining or Salt Pickling. Instead of pickling the vegetables in vinegar and sugar, this method uses lacto-fermentation or wild fermentation to pickle the green beans. This is a much healthier method that results in a probiotic rich pickle.
It’s one of the simplest methods to make fermented vegetables and I recommend it for beginners. Vegetables are submerged under salt water with spices to ferment. The salt water creates an anaerobic environment (oxygen-free) where lactobacillus (good bacteria) thrive and harmful bacteria can’t.
Brines can be flavored with many spices and herbs, like garlic, dill, peppercorns, juniper berries, bay leaves, ginger, turmeric, mustard, etc. Numerous vegetables can be fermented this way too, such as carrots, radishes, asparagus or zucchini.
Experiment with your favorite herbs and spices on different vegetables to find your favorite combinations. For example, I found that I love the traditional garlic and dill flavors with most vegetables, but I also love asian flavors like ginger, garlic, turmeric and chili with them too.
If you’re a little uneasy about fermentation, read my post, Tips to Ferment Vegetables Safely & Prevent Mold here.
What you will need
Making pickles using this method is straight forward and requires no fancy equipment. You will need a quart sized jar or similar, spices, purified water and high quality sea salt.
What to expect
For the first few days the brine will be clear and the green beans bright in color. About 3 days into fermentation the brine will get cloudy. This is a good thing. It means the lactic-acid bacteria are doing their job.
Once the brine is cloudy after 3-5 days, try one. It should taste sour and be crunchy. If they are not sour or are too crunchy, leave them out another day or two and try one again. Once they are to your liking place them in the fridge. They are ready to eat! They will smell like pickle heaven and be tender and crisp when ready.
- 1 lb green beans
- 2 cloves garlic
- 2 sprigs of dill
- ½ tsp chili flakes
- 4 cups of filtered water
- 2 tablespoons of fine celtic sea salt or other high quality sea salt
- 1 quart size jar or 2 small jars
- Wash and trim the green beans and add them to your jar. Trim them to fit inside the jar.
- Add the garlic, dill and chili flakes to the jar with the green beans.
- Make the salt water brine by mixing ½ cup of warm water with the salt and stir until the salt has dissolved.
- Add the remaining water to the salt water once the salt has dissolved.
- Pour the brine into the jar with the green beans. There should be enough to submerge the green beans under the brine. If not, make more brine and add it to the jar.
- Cover the jar loosely with a lid and store in a cool, dry place away from direct sunlight for 3-7 days.
- Once the brine is cloudy, try a green bean to see if it's ready. It should be sour and smell like pickles.
- Store in the refrigerator for up to a month.
Make my Spicy Garlic & Dill Pickled Green Beans this weekend and wow your guests over the holidays. These would also make great gifts for your friends. Comment below and let me know what your favorite pickles are.
Happy Fermenting!
-Danielle
….What the hell is “chili flakes”? Chili powder is made from different things, and does not come in “flakes”. And likely would be terrible with green beans unless MAYBE if they were fried with breadcrumbs or something.
Hi Danielle, I’m super excited about this recipe. Thank you for sharing it. I have a question after just putting together my first batch. I made mine in 1 quart size jar, as recommended in the recipe. I stuffed the green beans and everything else in the jar and then made the salt brine, eventually pouring it in with the remaining 3 1/2 cups of filtered water. I had about half of the brine left, since the 4 cup jar was already pretty full. Yet, your instructions mention to make more brine if you don’t have enough to cover the veggies in the jar.
How would it be possible to not have enough brine? I’m checking because this is my first time using this method and I want to make sure I didn’t mess up in some way. Obviously, not all of the salt made it into the jar with the veggies, so is the salt ratio incorrect? Thank you for your time! I truly appreciate your reassurance. :)
Great job on getting started! :) If following this recipe exactly then no, you wouldn’t need more brine. If someone were to use a bigger jar then they may need more brine. Sorry for the confusion.
I’m hoping kosher salt is ok? Didn’t realize I was out of sea salt!
That will work too.
Is that 3-7 days or week So? Days doesn’t seem very long..
Hi – I did follow the instructions; did not manage to get quite one pound of green beans (from the garden!) into the jar, and should have put the chilies and garlic and dill in the bottom of the jar as after packing all those beans into the jar it was trickier to include them. And I too had about 1/2 cup of brine left. No big deal – I am looking forward to the result! thanks for posting.
Oops….also will do another jar with a wide mouth – as it will be easier to get the beans in. Thanks again.
Has anyone actually done this? How did it come out?
Has anyone actually done this? How did it come out?
I have made String Beans, Garlic Cloves (which take about 10 or more days before putting in refrigerator). Today I am doing Asparagus. Different veggie densities have different time. So simple OMG. Use masking tape to put the date on your jar. I saved so much money on my Bloody Mary fixins now. Oh yay probiotics !!!!!!